Today I share with you some of my most recent thoughts on marketing, followed by some technical advice on how to create video shorts. If you are just here for the technical advice on video shorts, scroll down.
Lately I’ve been working less on product development, and more on promoting my existing products, mostly my Android apps, but also my WordPress plugins. One of the apps seems like it is beginning to take off organically just by being on Google Play, but I feel that all of them could benefit from a little extra push.
I don’t hate marketing any more
As much as I don’t love marketing or marketers, after trying to do it myself, I learned a lot about what it entails, and I even gained a little appreciation towards the discipline (not a lot, mind you). Getting your product known to potential users is a necessity, and I now realize that what people mean when they say “I hate marketing”, is that they hate marketing that is done badly. With marketing, essentially, you’re just telling people “Hey, I made this, maybe you’re interested in it?” There’s nothing wrong with marketing when done right, as long as you don’t annoy people.
An example of right versus wrong kind of marketing: I see a lot of app developers fail because they use interstitial ads too much in their apps. These are the type of intrusive ads that have the highest payout, but also they annoy users the most (what with being intrusive and all). In my apps, I like to focus on serving banner ads, and only show interstitial ads for features that are beyond the main value proposition of my app. Interstitial ads are OK, if you first negotiate with your users, honestly and without deception, that they will sit through an annoying ad and then they’ll get something extra. Something that they didn’t expect to get when they downloaded the app. I’m not going to get any ad revenue if the user gets annoyed and uninstalls my app. On the other hand, if the app satisfies a need, a small banner at the bottom of the screen is not going to annoy users. A banner ad can generate significant revenue, once you hit a respectable number of users.
Some key insights
As for advertising my own apps, I’m only an amateur marketer, but already I’ve identified two key insights that are prevalent in the industry:
1. Video is king.
2. Only losers pay for sex and marketing.
The first one is obvious. The main message of your campaign should be available in all modes of media: text, images, and video. But video is king. It’s engaging. It’s rich. It sets its own pace. It stimulates two senses (sight and hearing). Reading is so last-century. Show-and-tell is more effective than a long article explaining things. Customers want solutions, not lectures. (OK, that’s actually a third insight!)
The second insight is less obvious. Paying for ads only works marginally well, once you have an excellent product and an excellent well-tuned ad. If you don’t know exactly what you’re doing, you can burn through your advertising budget pretty quickly with very poor results.
And if you don’t know what you’re doing, you don’t want to rely on a marketing agency in my opinion. That’s even less efficient than just paying for ads. It’s best to learn the skill yourself. I’m generally a DIY type of guy, I only rely on a professional for accounting.
DIY posting on social media, can be more effective: It’s free. It’s organic. You get analytics feedback that helps you learn the skill. Your viewers let their guard down and give a chance to your message. Banner blindness is a thing.
Shorts: not just a type of pants suitable for warm weather
Video shorts are vertical videos that have an aspect ratio of 9:16, and are typically 1080×1920 if you aim for HD. All video platforms now have them. They are suitable for viewing by teenagers, with a phone held vertically.
Every platform has its own set of technical requirements or recommendations. For compatibility with most platforms, I aim at 30 to 45 seconds. (Incidentally, this is the attention span of the average zoomer.)
Here’s a few more insights to consider, in no particular order:
- Start by writing the short video’s script before doing anything else. Use short sentences. Active voice. Simple vocabulary. You are speaking English potentially to people who struggle with English, or who are young, or tired, or distracted. But even your more sophisticated viewers will respond better to direct messages.
- Here’s a good structure: Start with a hook (why should the viewer even look at your video and not skip?) This will be a joke, something interesting, a problem they may be facing, an engaging meme or video clip, a face, something. This must be done in the first 2 or 3 seconds of the video. Then, take a couple of seconds to introduce the name of the product. Then, in the body of your message, showcase the product, illustrating exactly three (3) main points about it. Three is a good number. Then repeat the name of the product. Repetition is key. Finally, close by showing the product again, (remember, repetition is key), and add your call to action. What do you want the customer to do? Go to your website? Download the app? Contact you? Where? Make it easy and direct. Add all the recognizing features of your product there. Branding (colors, fonts, tagline, icon, any graphics) should all be prominent in the last scene. If you are offering something for free, such as in a freemium business model, make sure to make FREE the last word, because that’s what people will remember.
- There is going to be a voice talking. It’s better if it’s a female voice. Females sound attractive to your male audience, and appear less threatening to your female audience. Nobody wants to listen to a guy mansplaining your product.
- Voice is not enough. Many people have their phone’s volume on mute. Subtitles must be available. Every. Single. Word. Is. Its. Own. Separate. Subtitle. Subtitles must be near the center of the screen, but maybe shifted slightly to the bottom or top so as to leave space for you to showcase the product. Text must be in a heavy sans-serif fond, with bright color, and with a thin dark border. You want the text to be readable on all kinds of background. If the platform supports it, also add the subtitles as text, even though you’ve hard-coded them into the video. I heard people like subtitles, so I add subtitles to my subtitles.
- All platforms let you add some text to your video. Again, keep it short and to the point. Preferably the text should not deviate too much from the transcript of the video, which is your main message. Repeat your message there in the same template. Repetition is key.
- You can use memes to make your message more engaging. Memes are not copyrighted, but are easily recognizable. Adding an element of humor to your ad can go much further than spending a big budget on a marketing campaign.
- Graphics and animations are what make your video look professional. You can get graphics from stock image repositories. Be mindful of any copyrights.
- There is theory behind colors. Blue and white conveys seriousness, etc. Same for fonts, design, etc. Know when to use serif versus sans serif fonts. You don’t have to be a graphics designer, but you should take some time to study the basics. Be aware of visual hierarchy. Learn these things, and you’ll never have to talk to a “creative” person again in your life. Big plus!
- You should likely add some background music at low volume. The music should not overpower the speech or distract from your message. Viewers must subconsciously associate your product with positive, upbeat feelings. The music must be upbeat, and must strike a stark contrast to their otherwise miserable depressed life. The music must also be somewhat repetitive, so as not to distract from your messaging. Bonus points if it has a hypnotic element (ads work best by hypnotizing the logical faculties and appealing to emotion). The music must appeal to a wide array of musical tastes. Acoustic guitar riffs are the cornerstone of advertising. You can find royalty free music on pixabay. Be mindful of any usage rights. Sometimes the artist has submitted the music to a copyright ID platform, and you may have to request and submit usage rights. But things are simpler if you find music that is completely free to use.
Spam your ad to all the platforms that support video shorts
Video costs a lot of time and effort to make. At my current skill level, one video short takes about a day of work. But once you invest this cost, now your finished video can be thought of as capital that you own. You can show repeatedly, for little marginal cost, on all the platforms where people typically go to dump their garbage or to watch other people’s trash:
- YouTube
- Tumblr
- TikTok
- Triller
- Snapchat
Only losers pay for video editing
Before you go and pirate Adobe Premier from a torrent site, or pay some dude on Fiverr to make you a video, consider this: You can do it with open source software for zero cost, other than your time. And it’s a useful skill that you want to learn yourself, not delegate to some marketing-agency-dwelling type of creep. (Sorry, sorry, I promised I’m done with hating on marketing. I will be on my best behavior from now on.)
I was under the impression that OpenShot was somewhat limited and buggy. That’s because I used to install it via the Ubuntu repositories on my machine. For some reason, the repository has an ancient 2.x version of OpenShot which is very buggy. It crashes often, and produces nasty sound artifacts. This is not the case with the latest version of OpenShot. You should take a minute to add their official PPA and install the latest stable version from there.
Learning OpenShot is a breeze. It’s popular, so there are countless tutorials on Youtube. Focus on learning how to do animations by adding keyframes to your media. I will discuss here only two technical aspects that I found required a little bit of digging: How to create video shorts and how to add subtitles.
Shorts custom video profile
When you start a video project, you want to define the output video format. There are several templates available, but none corresponds directly to the specifications that we want for a video short. We are going to create a custom profile. Create the following file: ~/.openshot_qt/profiles/shorts with the following content:
description=Short Vertical Video
frame_rate_num=24000
frame_rate_den=1000
width=1080
height=1920
progressive=1
sample_aspect_num=1
sample_aspect_den=1
display_aspect_num=9
display_aspect_den=16
If you’re wondering what these mean, you can have a look at the documentation for custom profiles.
Now you can start a new project with the “Short Vertical Video” profile.
Creating subs, the DIY way
There are, of course, a multitude of speech-to-text AI tools that will create subtitles for you automatically. One that works well is SubMagic. It offers many features including colors and emojis, and is well suited for social media videos.
But if your video is not too long, you can do it all by yourself. The advantage is that you don’t pay any money, and you are certain that there are no mistakes. You also have full control on where to break your sentences.
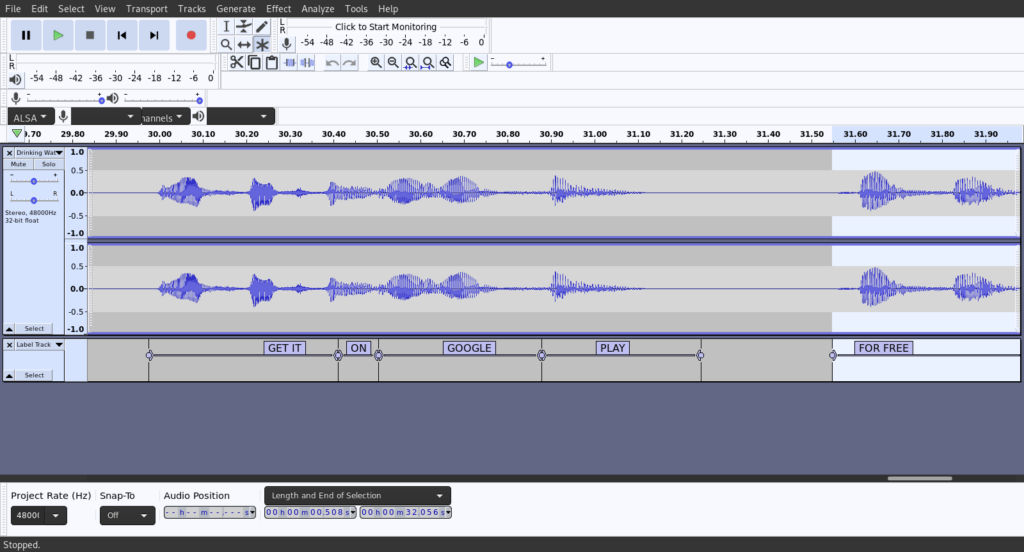
The best way to manually create subs is, surprisingly, not using a tool such as AegisSub, although it too can work well. I’ve found that the best tool for the job is Audacity. Here’s how you do it:
- First, render the audio of your final video.
- Load your audio in Audacity.
- Go to Tracks → Add New → Label Track.
- Select the first word. You can press Shift+Space to listen to your selection on repeat and ensure that you’ve selected the whole word and nothing more.
- Press Ctrl+B to add a label.
- In the box, type the word. In CAPITAL letters. This is for the TikTok generation. Don’t use punctuation unless absolutely necessary.
- Deselect your selection, and select the next word. Audacity will help you by snapping the beginning of your selection to the end of the label you just entered.
- Repeat steps 4 to 7 until you have done the entire length of the track. It gets easier as you learn how each phoneme looks like as a wave on the screen. For a 30 to 45 second video, it’s very doable.
- Save your project as an
.aupfile, because you may want to go back to it and make changes, especially if you made a mistake. - Go to File → Export → Export labels. Save your labels to a text file. This file is not yet in a format that can be imported into OpenShot.
- Go to https://magcius.github.io/audaciter/ and use the tool to convert your labels file to a SubRip (
.srt) file. SubRip is almost the format that we want to use in OpenShot, but not quite. - In SubRip, each entry starts off with a line that is the numerical index of the entry, then another line with the time range (two timestamps separated by
-->), and finally one or more lines of text, followed by a blank line. OpenShot doesn’t like the line with the numerical index, so we remove it from our.srtfile. You can replace the following regular expression that matches these lines, with the empty string:^\d+$ - Go to your video project in OpenShot. With a finished video, you will have several tracks full of small fragments of video clips, audio clips, and graphics being animated. You don’t want to attach your subs to any of that mess. Create a separate track for your subs.
- In the new track, add a 1080×1920 PNG image that is completely transparent. Here’s one.
- Stretch the image so it “appears” over the entire length of the video. (Of course, if your image is truly transparent, it won’t actually appear.)
- Ensure that your cursor is positioned at the beginning of your track. (Use Ctrl+← to navigate to the beginning). If you don’t do this, when you later edit the Caption properties you will create a new keyframe, and you don’t want that. You want the properties that you’re about to enter to apply to the entire track.
- Go to the Effects tab, and drag the Caption effect onto the transparent image in your subtitles track.
- The letter C will appear on the track. Click on it to edit the properties of the Captions effect.
- I will share here the settings that I like to use in my videos. You can experiment with other settings of course. Font:
Arial Black Bold 100pt(or any heavy font). Font size:65. Font alpha:255. Font color:Yellow #FFFF00. Stroke width:3. Border:black #000000. Left size:0. Right size:0. Top size:0.75. - Now go to the right side of the screen, and paste the SubRip subs (with the index lines removed).
- Watch the video to ensure that all the subs are shown. If a line is too wide, it will not be shown. So check the lines with the most text. If a line is not shown, either break it into two, or reduce the font size. Your lines should be individual words, so they should not be too long.
That’s it. You can now render your ad and spam-post it on all the aforementioned platforms. Add it into your articles, above the fold. Then, post links to your video shorts again and again. Repetition is key.
Great insights on DIY marketing! 🎯 Video is definitely king, and learning to promote your own products organically can be super rewarding. 💡 Why pay for ads when you can master the skill yourself? Keep sharing those tips! 📈 #MarketingHacks #VideoShorts
Thank you!